Woodworking can be defined as a process which involves skillful crafting of wooden materials. It is considered to be an art form as it requires reconstruction of a wooden structure into an attractive model.
When it comes to woodworking, we all need to make sure following the steps correctly so that the desired results can be achieved in the long run.
Many people are new to woodworking and have developed a passion for it. But to get the exact outcome, you need to be an expert.
For beginners, some expert tips can always work like wonders.
Whatever you want to craft, following some expert tips can make you a perfectionist even if you are beginner deep inside.
This article will tell you how to join two pieces of wood side by side. If you are someone who is eager to learn carpentry as an art – or a person who is a hands-on learner – this will help you to reach your goal.
Joining Two Wood Pieces Side By Side

There are thousands and thousands of techniques to join two pieces of woods side by side.
You can use your mind and generate a lot of creativity out of it, even though there are several methods and processes to join two pieces of wood side by side.
If you have a broader perspective towards things, then you can create something new every time you try. But then again, here are some simple steps for you to make the process easier and turn woodworking activities into a fun experience.
Using the Method of Making an Edge Joint
Here, we talk about knowing how to join two pieces of wood side by side by using the technique of making an edge joint. The steps are given below;
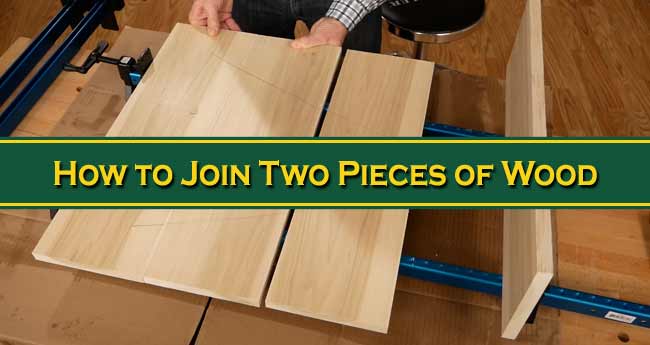
Step 1: At first, you need to start by getting and arranging your two pieces of wood, the ones which you wish to attach side by side and then mark them with chalk. Do not worry, you can remove chalk easily.
You are supposed to arrange the two pieces in such a manner so that the best looking side of each will be most visible.
Then, align their grains in an attractive natural pattern and do not stop until you’re satisfied with their alignment.
Step 2: Up next, you need to make a big V-shape across them with chalk or a lumber crayon. It is not mandatory that the lines of the V you are making have to be exactly straight.
You only need to form a rough blueprint all across the concerned boards. That way the V is legible only when the pieces of woods are correctly and rightly aligned.
Step 3: The next step for you is to place both the pieces of timber across strips of scrap wood. You are supposed to set thin, evenly sized strips of wood under both ends of the wood pieces to raise them off of your work surface.
Usually, while you do the procedure to glue and clamp your boards, excess glue tends to seep out from the joints. Hence raising the two pieces will keep your work surface clean.
See Also: How to Become a Carpenter: A Beginner Friendly Guideline
Just a useful tip; consider adding a strip of scrap wood in the middle if your planks are long and you’re concerned about bowing.
Step 4: The process eventually leads to the appliance of glue. You need to implement an even bead of glue along the edge of the pieces.
To get done with this and to spread an even bead of woodworking glue, you need to hold the bottle of glue with one hand and the nozzle with the other.
Then move the nozzle across the edge quickly and steadily.
One advice, try to avoid applying glue to both edges that you’re joining. This is primarily because too much of woodworking glue will make the whole scenario look incredibly messy. And, you don’t want to see a mess around you.
Step 5: Next comes the procedure of clamping and flushing. Now, after everything you need to clamp the two pieces of wood and ensure they’re perfectly and neatly flushed. Start by pressing the edges together and secure them with clamps.
Make sure it doesn’t get a chance to get misplaced. Then add the clamp at each end depending on the length of the two pieces of the wood board along with additional clamps in the middle.
One useful tip again; you should try to get your boards perfectly flush so that you won’t have to sand away imperfections after the glue has done its work and cured.
Step 6: This is the last step, as you are about to get the final result. Last but not the least, the final step is to wipe away excess glue after 20 minutes of the process.
In order to make the procedure of cleaning more comfortable, start off by taking a wet cloth and rub on the exterior of the timber where excessive glue has been used.
Remove clamps after waiting for around 20 minutes to half an hour and then flip the board over. Use a spoon or fingernails to scrape off any additional residue present on the bottom side of the material.
Step 7: The glue still needs several hours to cure, so handle the joined boards gently. In humid conditions, you’ll have to wait for an hour or longer to remove the clamps.
Now let the glue settle overnight. You can now remove the clamps safely.
However, keep noted that the glue applied will only reach maximum potential just after a few hours of initially applying.
Conclusion
I hope, now it has become easier for you to know how to join two pieces of wood side by side all by yourself. Get the pieces immediately, along with all the equipment and tools needed and get down with it.
I’m sure this is going to help you get the exact result you are looking for if you follow each and every step discussed carefully. You are just these few steps away to be a perfectionist in the world of woodworking. So get your fit wet and fall in love with the outcomes. Happy crafting!