Danish oil is oil generally made with either tung oil or polymerized linseed oil and is used as a wood finishing oil. Danish oil is ideal for novice woodworkers as it can be applied without any special preparation.
However, you need some directions; otherwise, things could go wrong. To help you learn the process, today, we’re going to teach you how to apply a Danish oil finish.
Things You Need to Apply Danish Oil
- Clean lint-free rag
- Danish oil
- A brush
- Latex gloves
- White spirit
- Paint stripper
- Microfiber tack cloth
Preparation
Before you can apply Danish oil, you need to prepare the wood. Now you can apply Danish oil on a wood that already has been dyed or stained, but do a test on an area of the wood to see if the Danish oil is able to penetrate the wood and has the desired shade on the wood.

Usually, previously stained, lacquered, shellacked, or varnished wood hinders the ability of Danish oil to seep or ‘feed’ into the wood, and so you need to wipe it off with paint stripper.
If the upper surface of the wood is rotten, you need to cut it out and repair before applying Danish oil, or if the wood surface is ‘grey’, sand it till a brighter surface appears for better absorption of Danish oil.
Make sure to vigorously rub the wood surface to remove any wax from the surface, dust, grime or dirt with white spirit. To ensure that the wood dries at a perfect temperature, make sure your work area is above 10 degrees C, is not damp or affected by direct sunlight.
There are two methods by which you can apply Danish oil and get it dried. The method you choose will depend on the time and effort you are willing to spend on it. The first is known as ‘one-day’ or ‘wet on wet’ method, and the second method is ‘one coat a day’.

One-Day Method
Let’s start by looking at the ‘wet on wet’ or ‘one-day’ method. With this method, you will be done applying the oil in a day, and you can use the wood within 48 hours.
Step 1: First, make sure you have completely sanded and dried the surface of the wood.
Step 2: If the wood is already varnished or painted, remove it thoroughly with white spirit or paint stripper.
Step 3: Remove all particles of dust with a microfiber tack cloth as any dust or dirt on the board will not allow proper absorption of Danish oil into the wood.
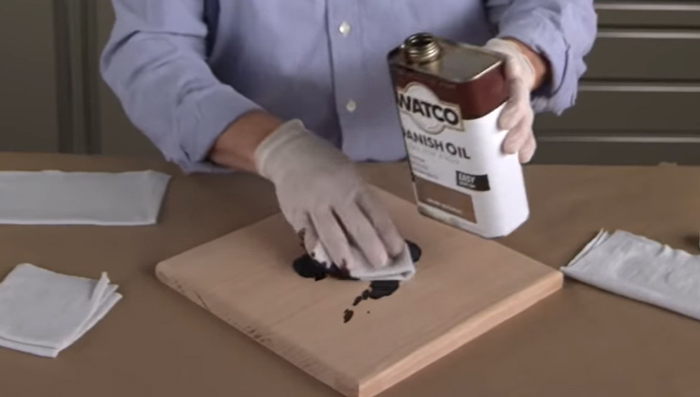
Step 4: With a lint-free rag, apply Danish oil thoroughly all over the wood surface. Apply three coats immediately one after the other, each time with lint-free rag. Stop when the wood has a ‘wet’ look and has stopped absorbing oil.
Step 5: Let it dry for 20-30 minutes. Then apply another coating of Danish oil. At this stage, the wood will look quite wet.
Step 6: Look out for areas where oil has not been absorbed properly. Oil them properly for a uniform finish.
Step 7: After 20-30 minutes, wipe the wood with a dry rag for any oil that pools on the wood.
Step 8: Then leave it to dry for an hour.
Step 9: After the hour has passed, wipe thoroughly with a clean and dry rag to remove any excess oil. But be sure to look for any patches that seem dry, apply oil in those parts only.
Step 10: Leave it dry for another hour and then wipe it again. At this stage, the board should feel dry when touched and has an oily sheen on the wood surface.
Step 11: Now, leave the wood to cure for 48 hours to cure properly.
Performance of the Danish oil on the wood will improve gradually within 1-2 weeks and make sure that no water is spilled on it in the meantime or you do not use it for any heavy work.

With this method, Danish oil will seep into the wood and make it waterproof. When you are applying this method, you cannot remove any dust, bumps, or fix any of the flaws in between the application of Danish oil. You need to fix all the problems after the wood is properly dried and cured.
One Coat Per Day Method
The second method is ‘one coat per day’, which requires a longer time frame. This method is suitable if you are not in a time constraint or for larger pieces of wood or furniture.
Step 1: First, sand and make sure that the surface is dry and ready for the application of Danish oil. Apply the Danish oil all over the wood surface and then leave it to dry for 20 minutes and then wipe any excess oil with a clean rag.
Step 2: Leave the wood to dry and cure for 24 hours. On the second day, once again, apply Danish oil and wipe excess oil after 20 minutes of resting. Then leave the wood to be cured for another 24 hours. The same steps should be repeated on the third day, as well.
Step 3: You will see that the wood will become darker and stop absorbing more oil. Nonetheless, apply more Danish oil and after 20 minutes, wipe away all the excess oil.
With this method, you can remove any dust, bumps, bubbles, or nibs from the surface in between the application of Danish oil with an abrasive paper or wool wire.
Final Thoughts
In conclusion, Danish oil is very easy to apply, dries faster, will protect your woodwork from water damage, retain the color of the wood and will not cloud the grain in the wood and give it a satin shine.
Whichever method you choose, make sure you choose a brand of Danish oil that is free from toxins, resins, and other harmful chemicals that will harm your furniture.

