For those of you interested in woodworking projects and have been doing it for some time, you know the struggle of working on a wobbly shop table and not getting much done.
As important as tools are for doing woodwork, you’ll eventually realize how much you need a sturdy workbench. But most workbenches in the markets are overpriced. Besides, why buy one when you can make one yourself?
Most of the workbench designs out there are too complicated. Ironically, you might end up needing another workbench to build it! But don’t worry because we’ve gathered a list of the best and simplest designs for you.
If you’re a beginner at woodwork, these 11 DIY plans on how to build a workbench might just be what you need.
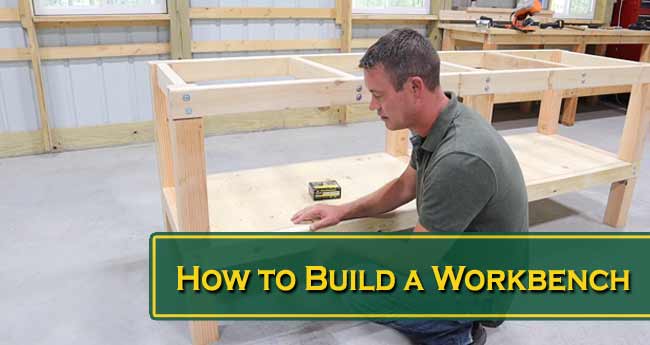
1. Regular Workbench
This kind of workbench looks very simple in terms of outlook and is considered a very user-friendly DIY project. Most of the joints are done by connecting the ends of two materials. This technique is known as a butt joint. To create temporary joints, screws, and wood glue are also used.

Necessary Materials
- Timber wood
- Two pieces of Plywood sheets (width – 4 inches, height – 8 inches)
- Caster wheels (for mobility)
- Wood stain
- Polyurethane (coating)
How to Build It in Easy Steps?
Step 1: Cut the parts of the workbench
Step 2: Make the shelf and drawer section
Step 3: Join the legs
Step 4: Line up and align the workbench top
Step 5: Install the drawers
Step 6: Do the sanding
Step 7: Add the stain and coating
2. Portable Workbench
These are cheap to build and are very flexible to move due to its portability. Make sure you are using the best moisture meter for wood. This small machine will give you an idea about the condition of wood that you are going to work with.

The whole workbench is made with plywood because of its thickness and sustainability.
Necessary Materials
- 3 Plywood sheets (width – 4 inch, height – 8 inches)
- Shelf pins
- Metal tubing
- Rosin paper (protection from dust and debris)
- Caster wheels (for mobility)
- Screws
- Bolts
- Wood stain
- Polyurethane (coating)
How to Build It in Easy Steps?
Step 1: Assemble all the materials in a category wise
Step 2: Cut the plywood in an accurate shape
Step 3: Make the box and frame
Step 4: Create the legs and attach it
Step 5: Attach top and bottom shelf
Step 6: Sand the edges gently
Step 7: The finishing touch
3. MDF (Medium-Density Fiberboard) Workbench
MDF workbench is very likely to maintain its quality throughout the whole year. It is considered as one of woodworking benches by many woodworkers. You can put it in your private room or a workshop area without giving it a second thought, and it will look very classy and professional.
Necessary Materials
- Oak hardwood (MDF)
- Metal rods
- S-clips
- Levers
- Screws for MDF
- Bolts
- Wood stain
- Polyurethane (coating)
How to Build It in Easy Steps?
Step 1: Measure the dimensions of the workbench according to the work area
Step 2: Make the top and shelf frame
Step 3: Build the legs and join it with the top frame
Step 4: Fit the cross beams and attach the footpads beneath the legs
Step 5: Create the lower shelves completely
Step 6: Use high grit sandpaper
Step 7: Finish it off with the wood stains and polyurethane
4. Garage Workbench
You might find it handy if you can easily carry or move the workbench onto different places. If it is light in weight, you won’t have to apply extra physical efforts. To make it perfect, you need to have some practice beforehand. It is better that you do some consultation with the professionals before you start working.

Along with that, search the website about wood lathe for beginners, and you will find out the right one for this job. This will also be a big help for other workbench plans. So, always consider this matter.
Necessary Materials
- Birch plywood sheet
- Lumber (for the legs)
- Kreg screws (screws with a perfectly flat head)
- Kreg clamps
- Pocket hole jig (guides the drill to make accurate holes)
- Screws
- Bolts
- Wood stain
- Polyurethane (coating)
How to Build It in Easy Steps?
Step 1: Measure the dimensions
Step 2: Cut the plywood according to the measurement
Step 3: Adjust the crossbar in the rear side
Step 4: Put the bench on your desired location to check
Step 5: Build the top portion
Step 6: Sand (if necessary)
Step 7: Use the stain and coating for safety
5. Mobile Flip-top Workbench
The name says it all. You will be able to move it from one place to the other, and because of this feature; you can easily work on any projects in any of your chosen room.

The attractive quality about it is the flip-top specification, but the challenging thing is the installation process, and due to this, you will need a large number of fasteners and a big portion of glue. As a beginner, this project might sound tough to you but have no fear; with patience and time, you will get this thing done smoothly.
Necessary Materials
- Timber wood (2×4, 1×2 and 1×3)
- Plywood sheets (width – 2 inch, height – 4 inches)
- Caster wheels (for mobility)
- Washer
- Screws
- Bolts
- Wood stain
- Polyurethane (coating)
How to Build It in Easy Steps?
Step 1: Assemble all the tools
Step 2: Make the vertical divider
Step 3: Start drilling holes
Step 4: Align all the vertical dividers
Step 5: Build and attach the flip-top frames
Step 6: Create the base
Step 7: Install the top portion securely
Step 8: Sand the edges
Step 9: Apply the coating and stain
6. Basic Workbench Idea
Anyone starting on woodwork needs one of these. The tools you’ll need for this are a circular saw, wrench, a belt sander, a drill, and measure tape. And, the materials you’ll need are- 2×8 inch lumber, 2×4 inch lumber, some plywood, carriage bolts, and 3-inch wooden screws.

Usually, the plywood used for basic benches is ½ inch x 8 ft in size. Firstly, you should construct the four leg assemblies. Connect the ends of one leg piece with the face of the other so that they line up flush. Once wood screws are inserted, then set the legs inside the corners.
Then holes of 3/8 inch sizes should be bored through the top rails and legs. After that, you’ll have to insert carriage bolts as per size from the outer of the top rails through leg pieces. It’s good to install a washer and nut on each carriage bolt to tighten them.
Secondly, you’ll need to mark up to 12 inches from the bottom of each leg. Then the rails need to be secured properly by aligning the tops with those marks. Insert the short bottom rails between the long ones.
The outside face of the bottom rail and inside face of the leg should be connected. Again, secure the short rails to the legs with screws.
Finally, you’ll turn the bench upward and align the plywood top flush with the edges. Use flathead screws to secure the top. This way, you can remove it for a replacement later on.
7. Garage Workbench Idea
This type of workbench will be useful for those of you who like building things now and then. You can use either plywood or lumber for this bench, depending on how light you want the product.

The tools for building this are brads (0.5″), decking screws (2.5″), and 1″ screws for the top. For the frame, you’ll need a 2″x4″ and 1.5″ by 3″ dimension lumber. Inner cross pieces of 6×21″, legs of 6×37″ and hardboard of 2’x2’x4′ are needed for a smooth surface.
You first have to set the legs so that everything is square. Use a screw for this. From the bottom, set the rear crossbar 14inches far and screw each joint by rotating the structure sideways. After this, you have to set it upright to check if it’s level. Adjust the legs accordingly if needed.
Since this is a garage bench, two layers of OSB or plywood should be used for the top. The hardboard is tacked onto it after. After this, you can easily add a shelf to it if you want. This type of workbench will allow for more storage comparatively.
8. Apartment Workbench Idea
No apartment is complete without a workbench; that’s even truer for DIYers. But a big bulky bench is unsightly and not suited for the tiny apartments nowadays. So, for this type of bench, you’ll need to plan it out and keep everything simple.

Cedarwood is very good to use for this type of project as it has a nice scent to it. Invest in one of the good moisture meters for wood as well before building this. If you want a bench that’ll last and not rot away, it’s best to check the wood’s moisture content and such beforehand.
The easiest way to do this is to assemble each side first and then screw them together properly. Put the board across the top to make the working surface. There should be scope for an overhang, and you can install modular parts too. The modular section should be on caster wheels to allow mobility.
You can screw jar lids to the bottom of the modular section to create room for storage. Remember, the modular section will work as a lid to cover the extra storage parts while being a work surface.
At a suitable part of the bench, you can make a magnetic tool hanger. All you need to do is screw a flat metal bar to the wood and line up bar magnets on it. You can hang your small tools a bit from the top while heavier ones should be near to the bottom.
9. Easy-Built Workbench Idea
If you are the type to look for an easy way out everywhere, this plan might be best for you. For this build, you’ll need- 2×6 wood boards (6′ cross beams), leg pieces (30″), leg braces (2′), plywood (3/4″), particleboard (3/8″), deck screws, and bolts.

It’s good if you can get tabletops with half-foot longer dimensions than the cross beams and leg braces since it’ll give space for making an overhang. You’ll also need some wood glue to put the pieces together.
The second step in this plan is to assemble the legs. You need to align the legs properly with the leg brace so that the braces extend 2 inches past it. Attach the pieces securely with bolts and repeat at the bottom part of the legs.
Then you’ll need to attach the cross beams. Attach the cross beams to each leg assembly. The length of the beams will define the distance between the outer legs. It’s good to place the middle leg about 20 inches far from the right one.
Rest the beams on top of the braces and attach them with three screws. The back cross beam should be secured outside of the back leg assemblies.
Finally, you can just secure your tabletop with deck screws. The plywood would be your tabletop, while the particle board should be glued to it after. You can insert two more screws through the tabletop into each leg brace. And you’re done!
10. Closet Workbench Idea
If space is a major issue and fitting a workbench in your room is too difficult, we suggest you try building this on your own. The best thing about this closet bench is that you can use parts from your old bench and incorporate them here.

You’ll need to begin by framing your closet wall by putting 2×4″ planks into studs around the wall. For stability, add some cross bracing. Using drywall screws is best for this step.
The second step would be to prepare the top. There’s honestly no hassle here. You can use any sort of sturdy wood of your choice, but we recommend some OSB. The size should be according to your available closet space.
Attach them with screws and make a front piece for the bench. Just use some plywood to make the front, and your bench is ready to use.
If you need some extra storage, you can always put up a pegboard for your tools. From saws to a wood lathe for beginners; you can store everything easily in a compact space with this built-in closet bench. This is very easy to make and also space-friendly. What better can a workbench offer, right?
11. Collapsible Workbench Idea
Do you want something sturdy to work on and is easily moveable? Then this design will probably fit your taste. A collapsible workbench might be the best woodworking bench ever.
The best thing about collapsible workbenches is that they can be taken apart and put together in minutes without trouble. So let’s get to the plan.
For this project, you’ll need-
- Four 2”x8”x10’
- One 2”x8”x8’
- One 2”x6”x8’
- 16 lag screws of ¼” x 2 ½” size
- 16 washers of ¼” size
- wood glue or nails
For this project, you’ll need to make sure all your wood pieces are precisely cut and accurate in size. Once you’ve got everything cut and set properly with glue.
You can put screws in. Then you need to notch the bottom stretches so that they fit in the legs well. Once the stretchers are fitted and attached to the legs, the base will be complete.
The final step is just to attach the top. You can use double layers of plywood or OSB for this. Gluing the top will make it tightly attached. Or you can screw the table from the bottom up.
This design can be taken apart easily. You just take apart the lag screws, and it breaks down into a flat pack workbench magically. And if you’re still not satisfied with these designs, you can get yourself a nice router table by checking out some of the reliable router table.
Final Words
Nothing puts one in the mood for work than a proper workbench. And no matter what your situation is, these 11 DIY Plans for Workbenches for beginners can help you to work everything out easily.
Choose any of the workbenches and get on with your project. The woodworking task will require a good router table, so be careful about it. Check router table reviews to gain extra information from the customers’ point of view. With that knowledge, you will get an idea of which one to buy according to your budget.
Have a good day.