Wooden signs are considered as classy and stylish by many people around the world. Why wouldn’t it be? This magical masterpiece brings class and beauty to the place where it will be fitted. Whether you are putting it onto the entrance gate or in the living room, you will be astonished every single time you get to look at it.
If you prefer to make it homemade, you can use it as a gift and surprise your loved ones, and in case of a professional, you can sell it for a good profit. As you have seen, along with its attractive feature, it has the potential to bring money and happiness if you can apply it in the right direction.
Making wooden signs might sound challenging, but the good news is that it is a very easy task if you have the spot-on knowledge about it. So, the following article is filled with all the information about the making procedure of the wooden signs with a router. Let’s get started.
Equipment That You Need
- Wood router
- Router bit (V-Groove)
- Pencil
- Letter template
- Sandpaper
- Safety goggles
- Gloves
- Dust mask
- Vacuum cleaner
Steps to Make Wooden Signs with a Router
Check out the simple step by step process to get the overall idea.

Step 1: Decide What Kind of Signs Do You Want
This is the most important step of all because, without it, you won’t get your desired result. You have to decide what kind of wood dimensions that you are going to work on and what size and number of letters that you are going to insert in it.
If you are more interested in the letters, pick the dimension of wood that suits your requirements. Besides, you can increase or decrease the size of the letters according to your satisfaction level.
You should go for the bigger wooden board to be on the safer side. Any size of letters will easily get adjusted on it, but for a large number of alphabets or numbers, customization will be necessary.
Before you start making signs, make the board as smooth as possible. You can do that by carefully sanding various rough areas along with the edges. This sanding part is a strategic way of making the signs look as appealing as possible.
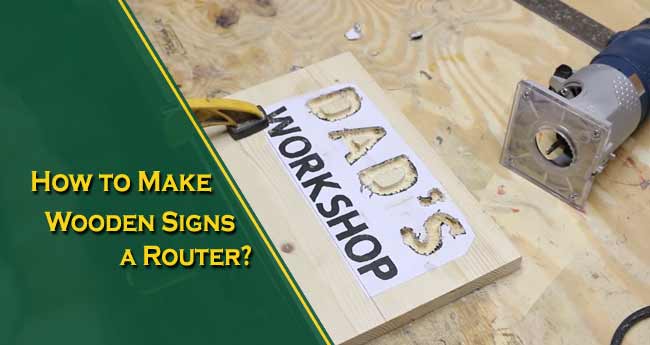
Step 2: Create the Outline of the Signs on the Wood
You can use a pencil for this process. Use your imagination and draw it onto the wood. If you prefer a different approach, you can copy some arts or words from the internet. Don’t put too much pressure on the pencil as this might create some unwanted areas that will look odd when you are finished with the whole task.
Updated technologies will let you draw the signs with the help of a computer. For professional purposes, accurate wordings and signs are highly important. In this case, you should avoid drawing with your hand.

Step 3: Turn on the Router
Use the router on a good router table so that you can have a flexible cutting in all angles. If you don’t have one, place the wooden board gently onto a bench or foam. Just make sure that it won’t shake or move during your cutting. Clamp the board securely in this scenario.
Take the V-Groove router bit and fit it securely on the router. Check whether it is performing well or not. Run it in old wood to test the bit’s sharpness. If you are satisfied, start working with your chosen wood. Move it gently onto the signs, and don’t go too deep.
Keep it around a quarter of an inch of every depth so that the signs can flourish beautifully. Cut the signs in a way that you can easily guide it from beginning to end.
Now turn on the power tool, and please be calm and patient while you are moving it. Different models work differently in terms of ease. Large ones are time savers and easier to cut in comparison to the smaller ones. Always use both of your hands while you are working with it.
To gain additional control, you can hold the power tool in a downward position and keep your forearms on the tableside. Slowly push the router according to the design of the signs, and for its movement, use your wrists.
Strictly maintain this body posture, or else you can damage the woods and injure yourself along the process.
Step 4: Finish It off
As you are done with the signs, you can now upgrade its beauty by painting it. All of it will depend on the kind of creativity that you are going to apply.
Applying paints onto the letters is easy, but the main challenge comes when you have to work on the background. This might consume your time, and if you are in a hurry, you should leave it for the next day.
To get that natural look, you can let go of the painting ideas and instead leave the wood outside for some amount of time in the sunlight. Just sit back and relax and let nature do your work.
When it is done, take it inside and see the new result. You will be surprised to see that it has turned into grayish color and looks more beautiful than its previous form. If you wish, you can apply varnish on it frequently, so that it looks new all the time.
Once you are done with the design and the color upgrade, sand the rough areas for the final time.
Tips For Creating Wooden Signs
- When you are done with the router, clean the dust with a vacuum cleaner.
- Wear protective gear in all projects. Look at the equipment part in the article; you will find all of it.
- Go to the local store to check out the woodworker’s crafts. From there, you might get some ideas that could stimulate your creativity. Don’t forget to consult with the professionals before you leave the store.
- Turn on the router first and then put it on the wood. Don’t place it first and then start the power tool. This might ruin the wood and signs before you even start your project.
- Keep your kids out of reach while you are working with this task, as this includes sharp and electrical objects.
Conclusion
Make the wooden signs and show it to your loved ones. Create different letters and designs out from it. If possible, start your own business with it. You never know when this turns out to be a profession for you if you are new to this, fingers crossed.
Have a good day.
Relevant Reading:
- Our top 10 tongue & groove router bits list for you
- Choose right rail and stile router bits from our list
- Select CNC router spindle from our list
- Cool things you can do with your router table
- How to make interesting things with wood router?
- Steps to cut square hole in the wood router
- How experts use wood router?
- Which wood router is good for you?